Table of Contents

Go Back

Phase 0

This is where the preparation stage starts and run over the 2022 summer

Table of Contents

About

Plan

The main goal of this stage is really to gather knowledge about the details of hydroponics farming as much as possible since at the start of this project, my knowledge on hydroponics is just on the surface level. This encompasses understanding different types of hydroponics farming, weighing out both its advantages and advantages, learn about the basic necessities for a plant to grow, knowing what types of plant is suitable to be grown using hydroponics, and much more... :)

On top of that, a pilot project is carried out to test out the practicality of building a simple farm in a small area (my house). This can also provide a general understanding of the work process and the amount of effort it takes to grow a plant from the seedling to its harvest.

Overview

Shown below is a picture of the hydroponics system I managed to built at the end of this stage:

As you can see in the not-so-clear picture (I wish I had taken a better picture though), I have managed to plant a lettuce using a hydroponics system called deep water culture and integrated several features into the system including a control panel and automated grow light system.

The control panel is able to display information about the status of the LED and current time, and can be use to set the timing at which the grow light should be turned ON and OFF. The main brain of this system is an Arduino Uno which at this point only capable of operating the logic behind the control panel, and switching ON and OFF the grow light at the designated time. Both the grow light holder and the casing for the control panel are 3d printed using facility provided by UCL.

At this stage, the only variable that I maintained and monitored regularly is the nutrient level of the system due to the fact that I have an EC sensor with me. However, the level of pH, humidity, and temperature of the system are not monitored regularly at this stage.

Hydroponics System

What is Deep Water Culture (DWC)?

Deep Water Culture is one among many types of hydroponics system that exist. It is by far one of the easiest and cheapest system to set up (which is good for me since I had no experience in farming with hydroponics in general).

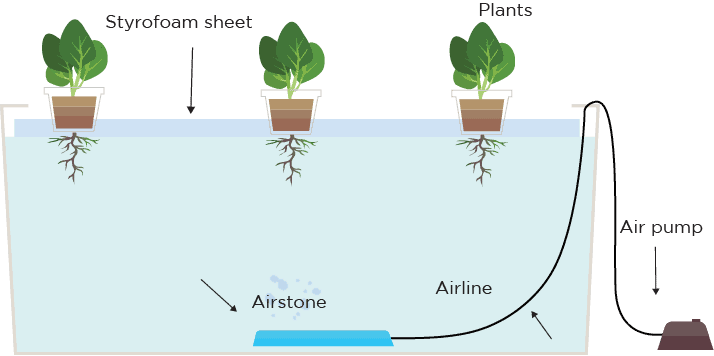
Deep Water Culture is a method of hydroponics farming in which the root of plant is submerged deeply (hence the word 'Deep') in a reservoir filled with nutrient solution. As can be seen in the figure above, the system requires an air stone, which will pump oxygen into the reservoir. This is integral as the means to provide enough oxygen to the plant. Plus, the oxygen allows the plant to uptake the maximum amount of nutrition, resulting in acceelerated, prolific plant growth.

Because of this reason, Deep Water Culture is the method chosen for this pilot project (and perhaps for the whole project) due to its ease of set up which enables me to focus on doing the important thing with respect to the goal of this research project (such as implementing IoT into the system) rather than busy getting the hydroponics system to properly work (if using different method).

My Hydroponics System

Type of Plant: Lettuce

Type of Hydroponics System: Deep Water Culture (DWC)

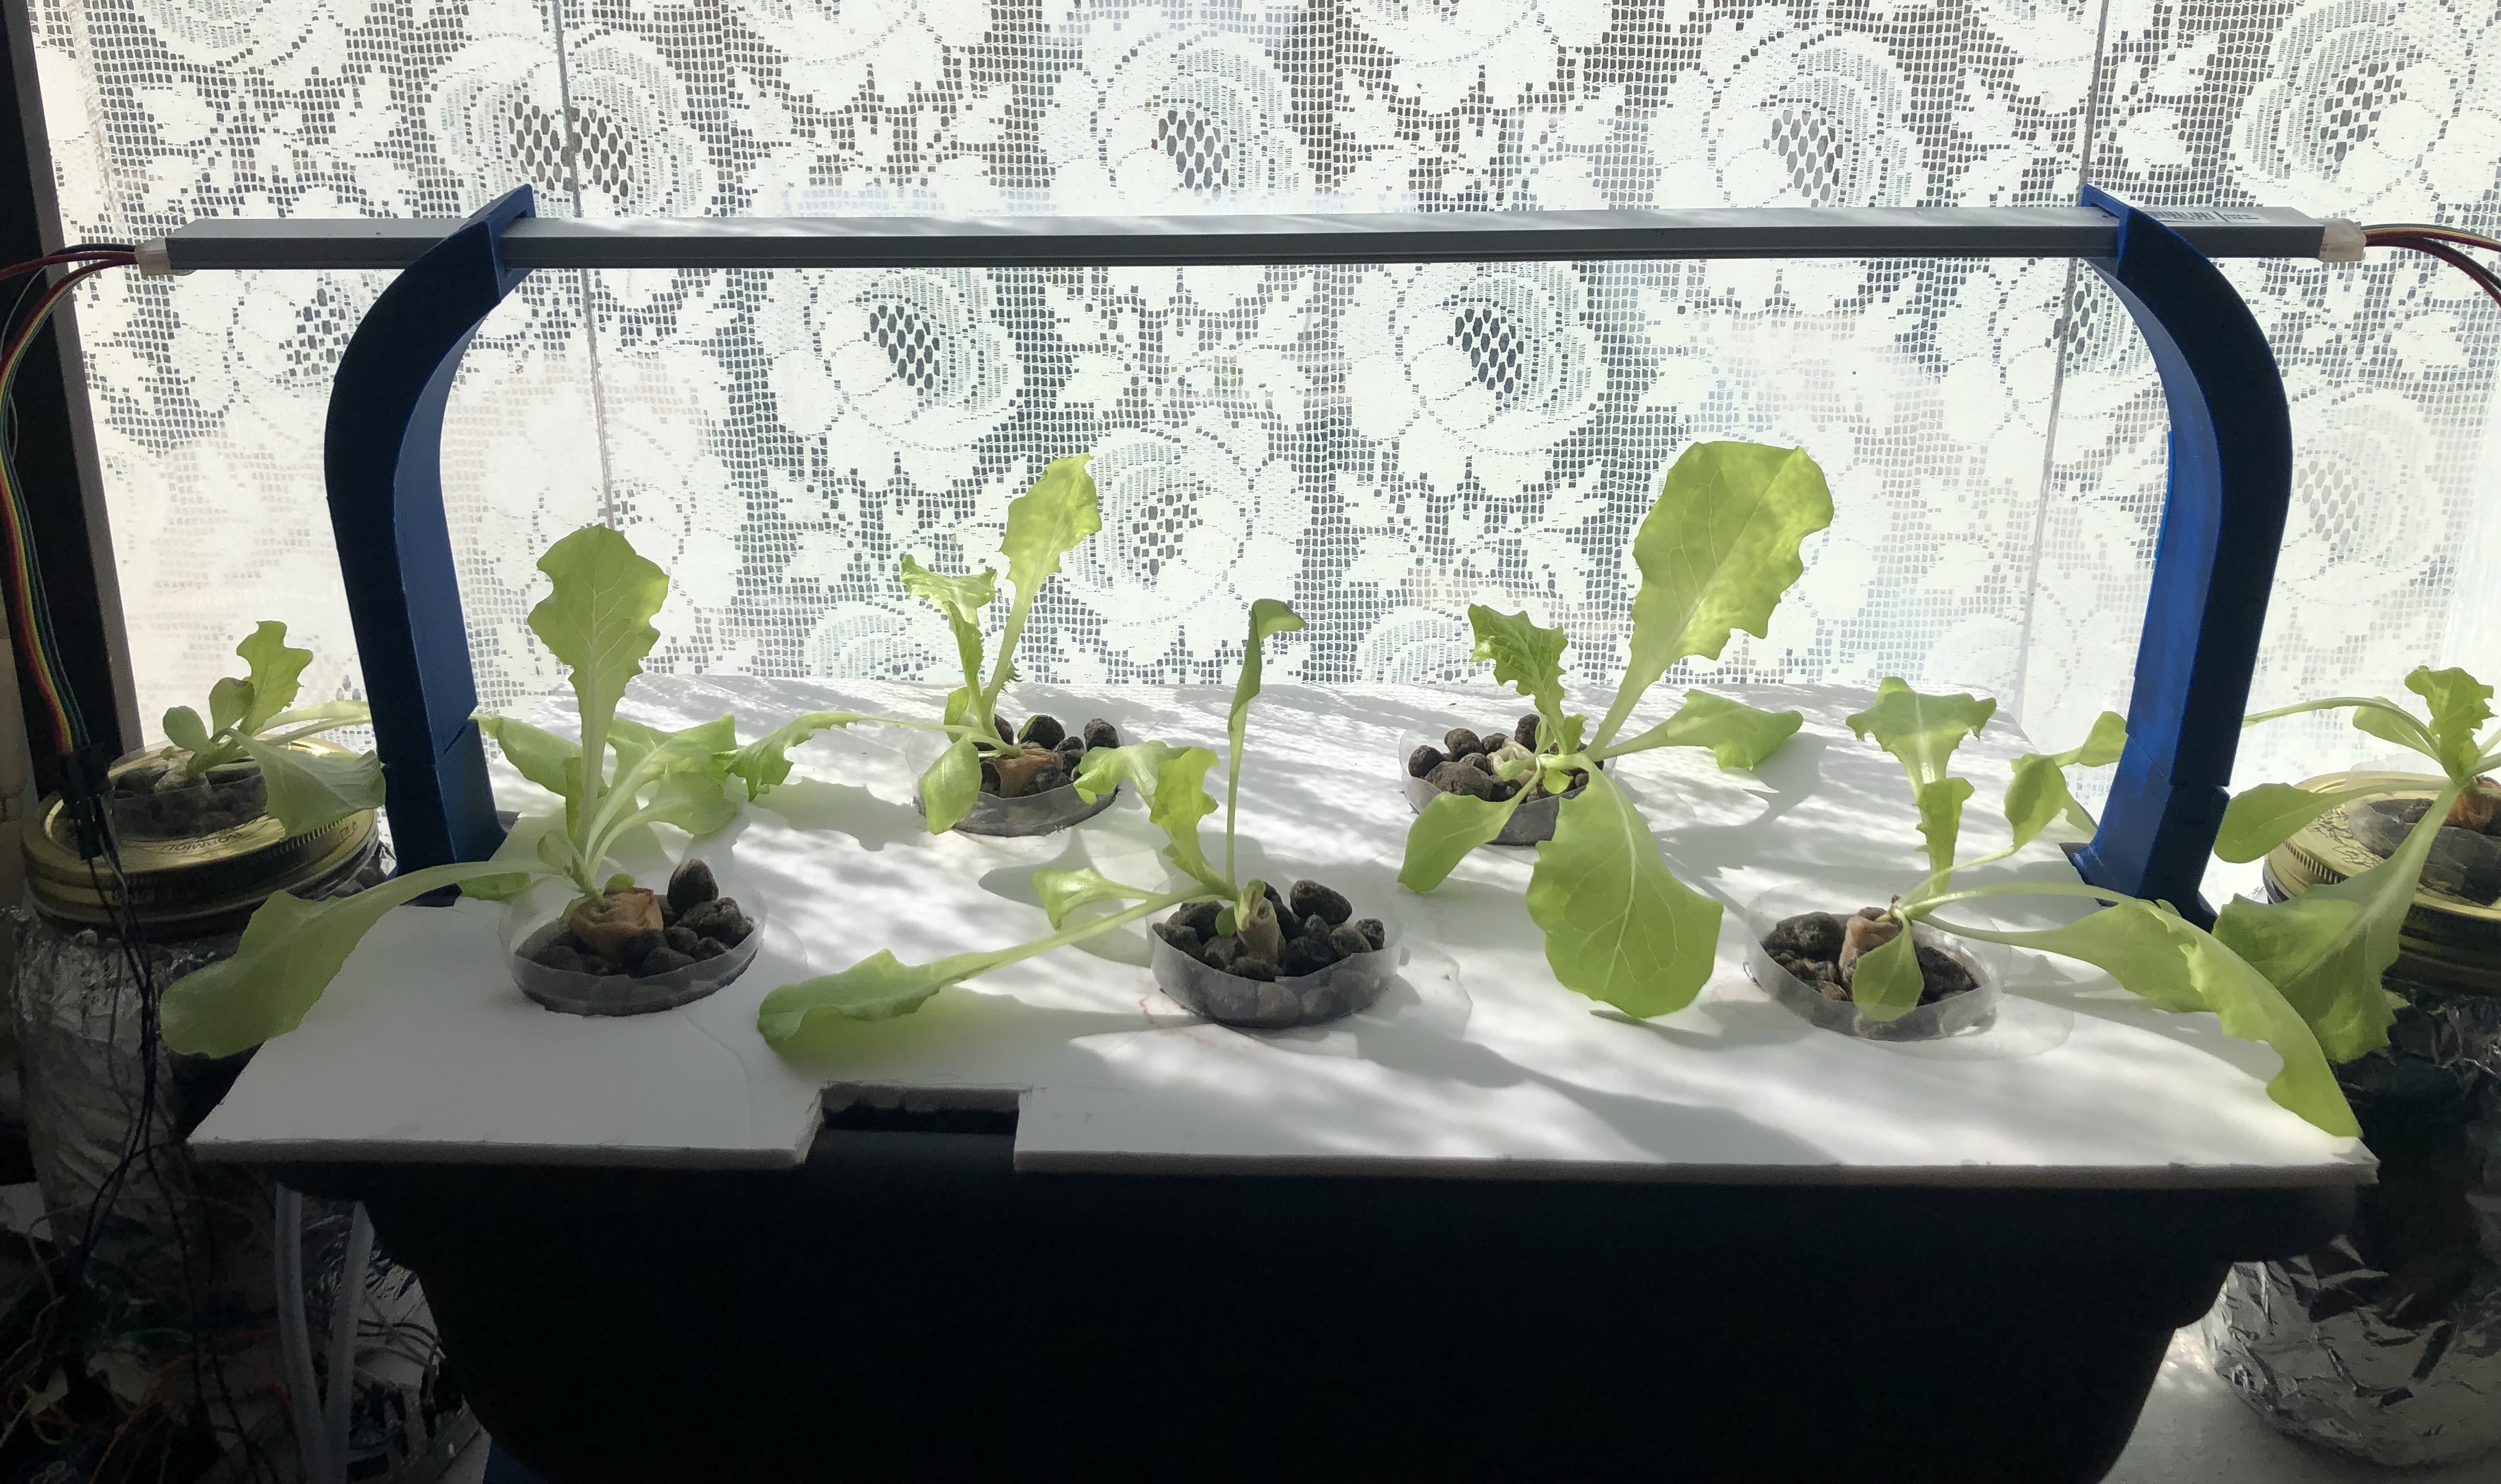
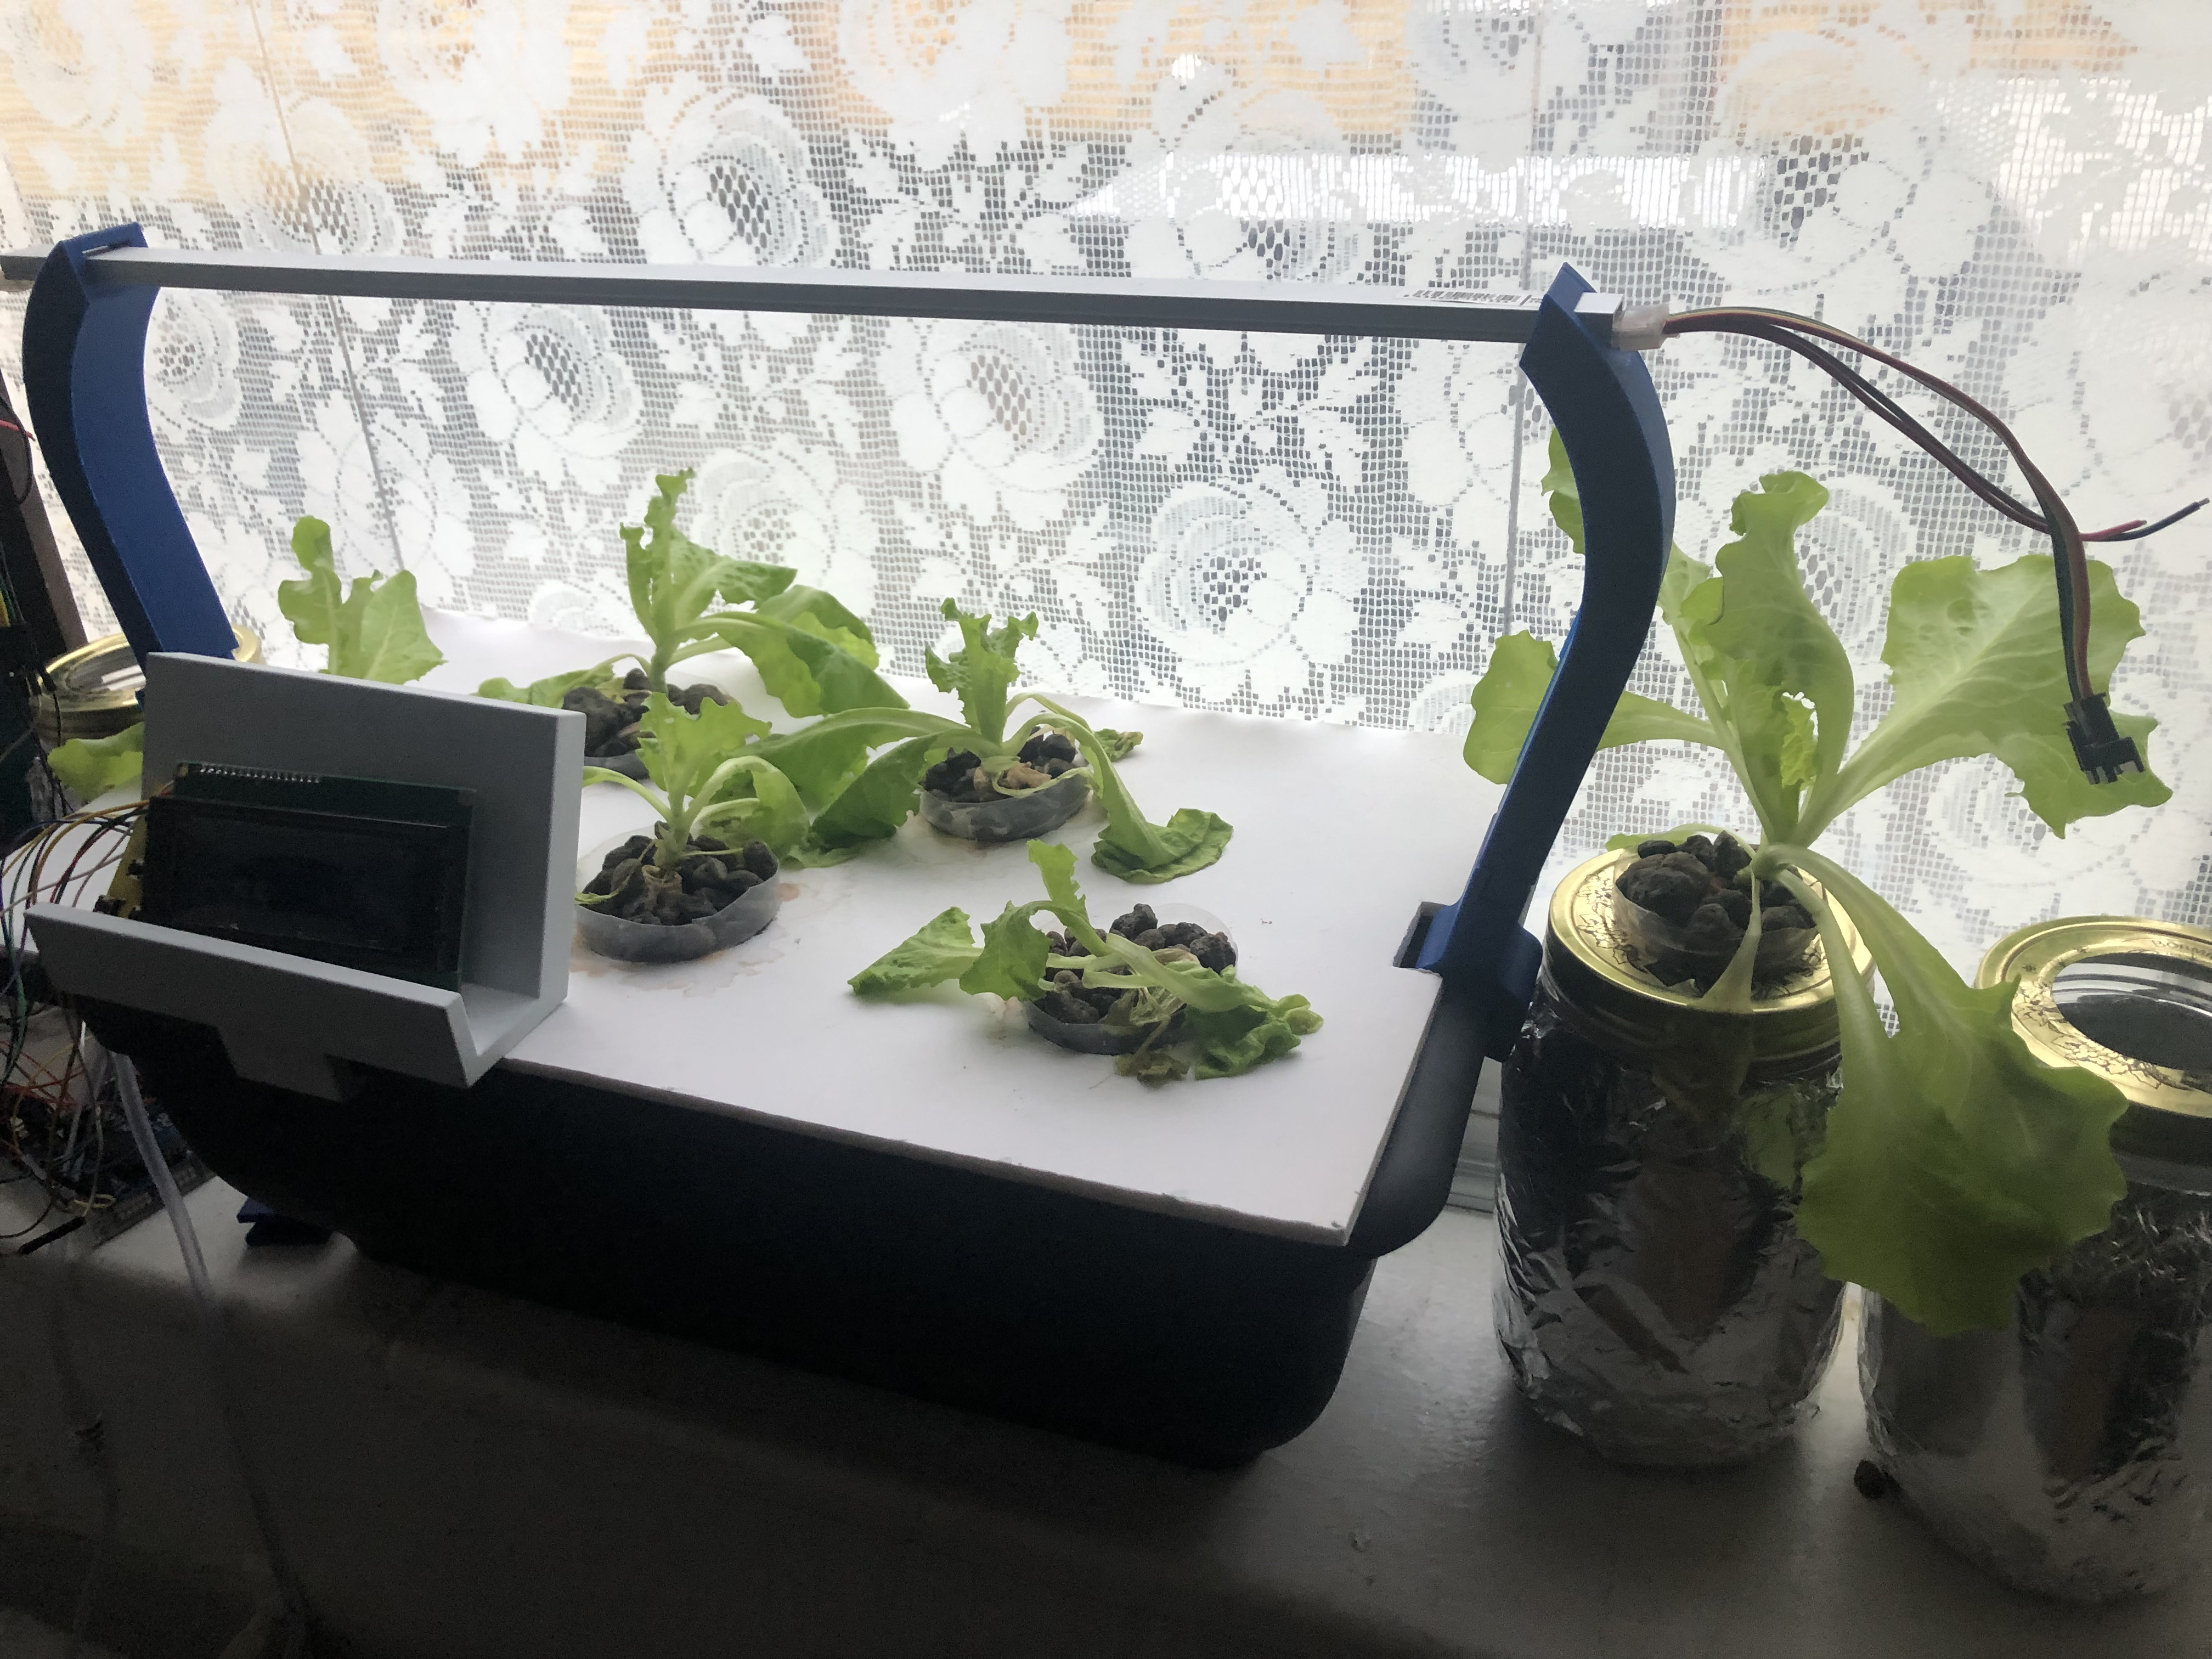
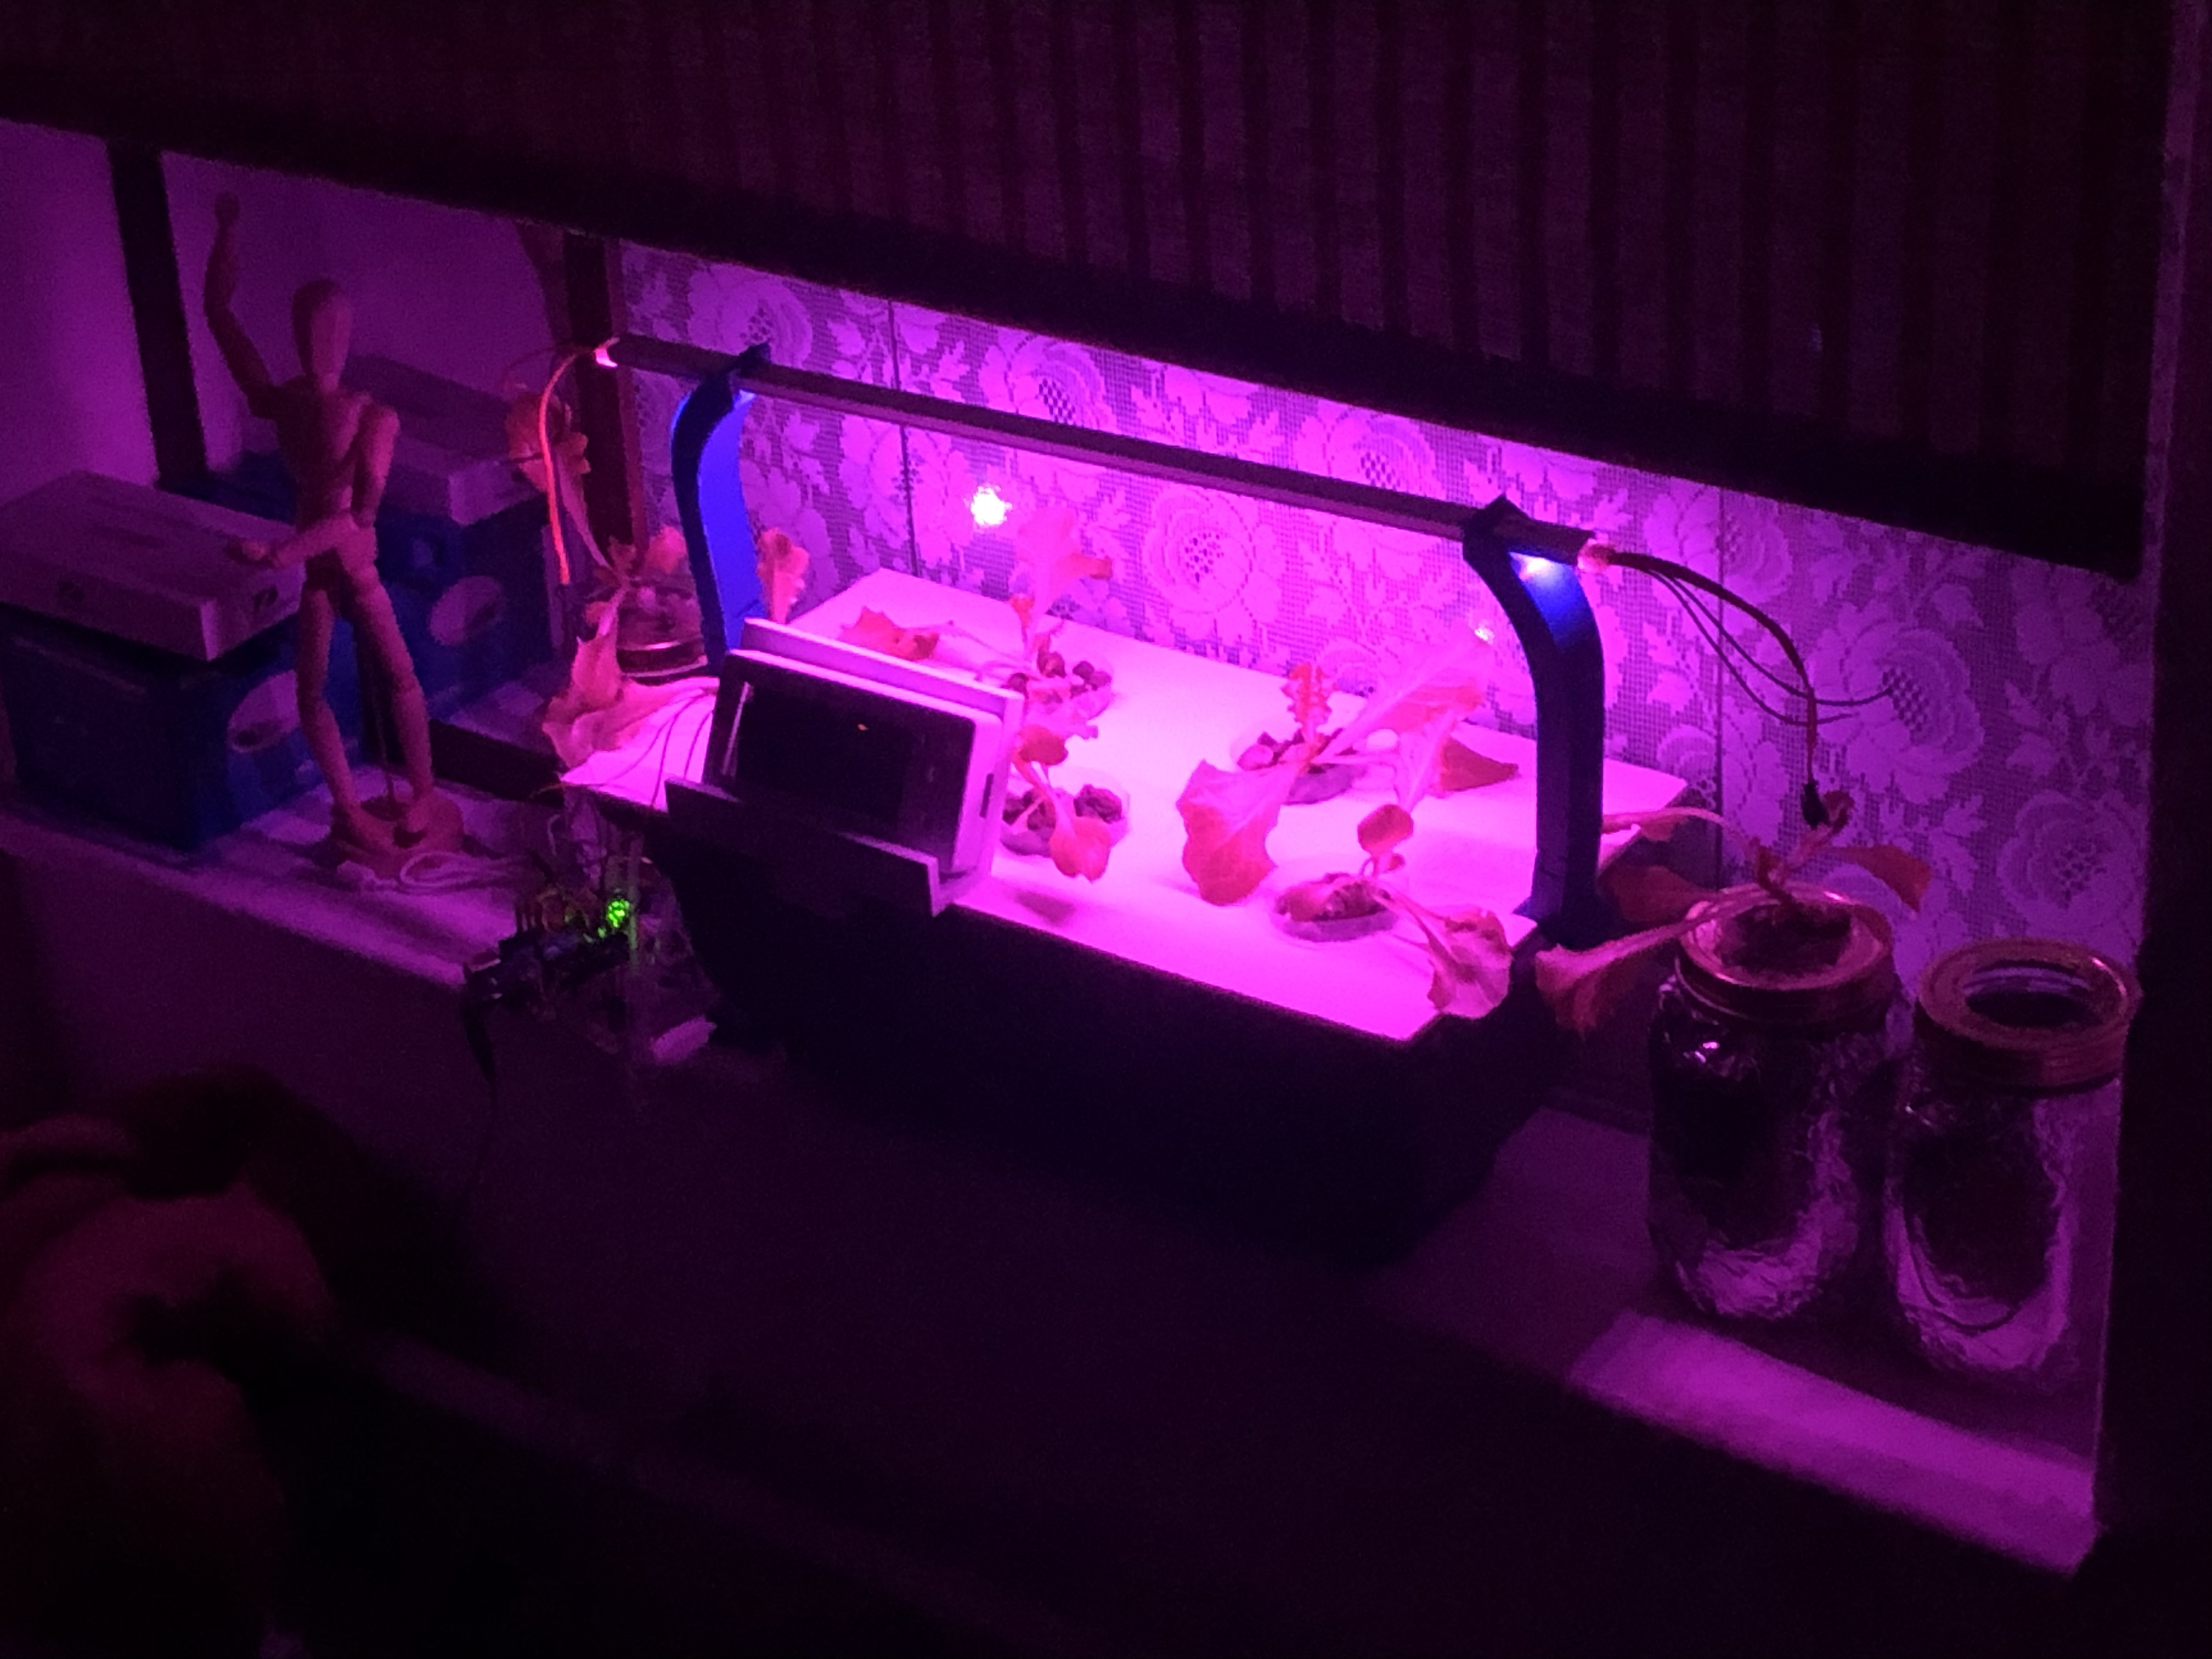
Shown above is the completed deep water culture hydroponics system (as of 8th October 2022).

  • A long rectangular planter pot is used as the base of the system.
  • At the bottom left of the picture, there are two tubes indicating two air stones are used in this system.
  • The nutrient solution is attained by combining tap water with nutrient called "Xpert Nutrients Master Grow Growth Feritlizer" before adding pH down solution to bring the pH to ~6 (since tap water has a pH value of ~7.5)
  • Plastic cup is used as the pot / net cup for the plant. Solder is used to create holes on the plastic cup to allow roots of the plant to escape the cup and enter the nutrient solution
  • Expanded clay pellet and paper towels are used as the growing medium
  • Adafruit DotStar LED is used as the grow light as it has the ability to tune into any RGB color which can be really handy for experimentation.

Main Process Involved

Stated below are the steps that I followed throughout the lifecycle of a hydroponics system:

  1. Seed Germination
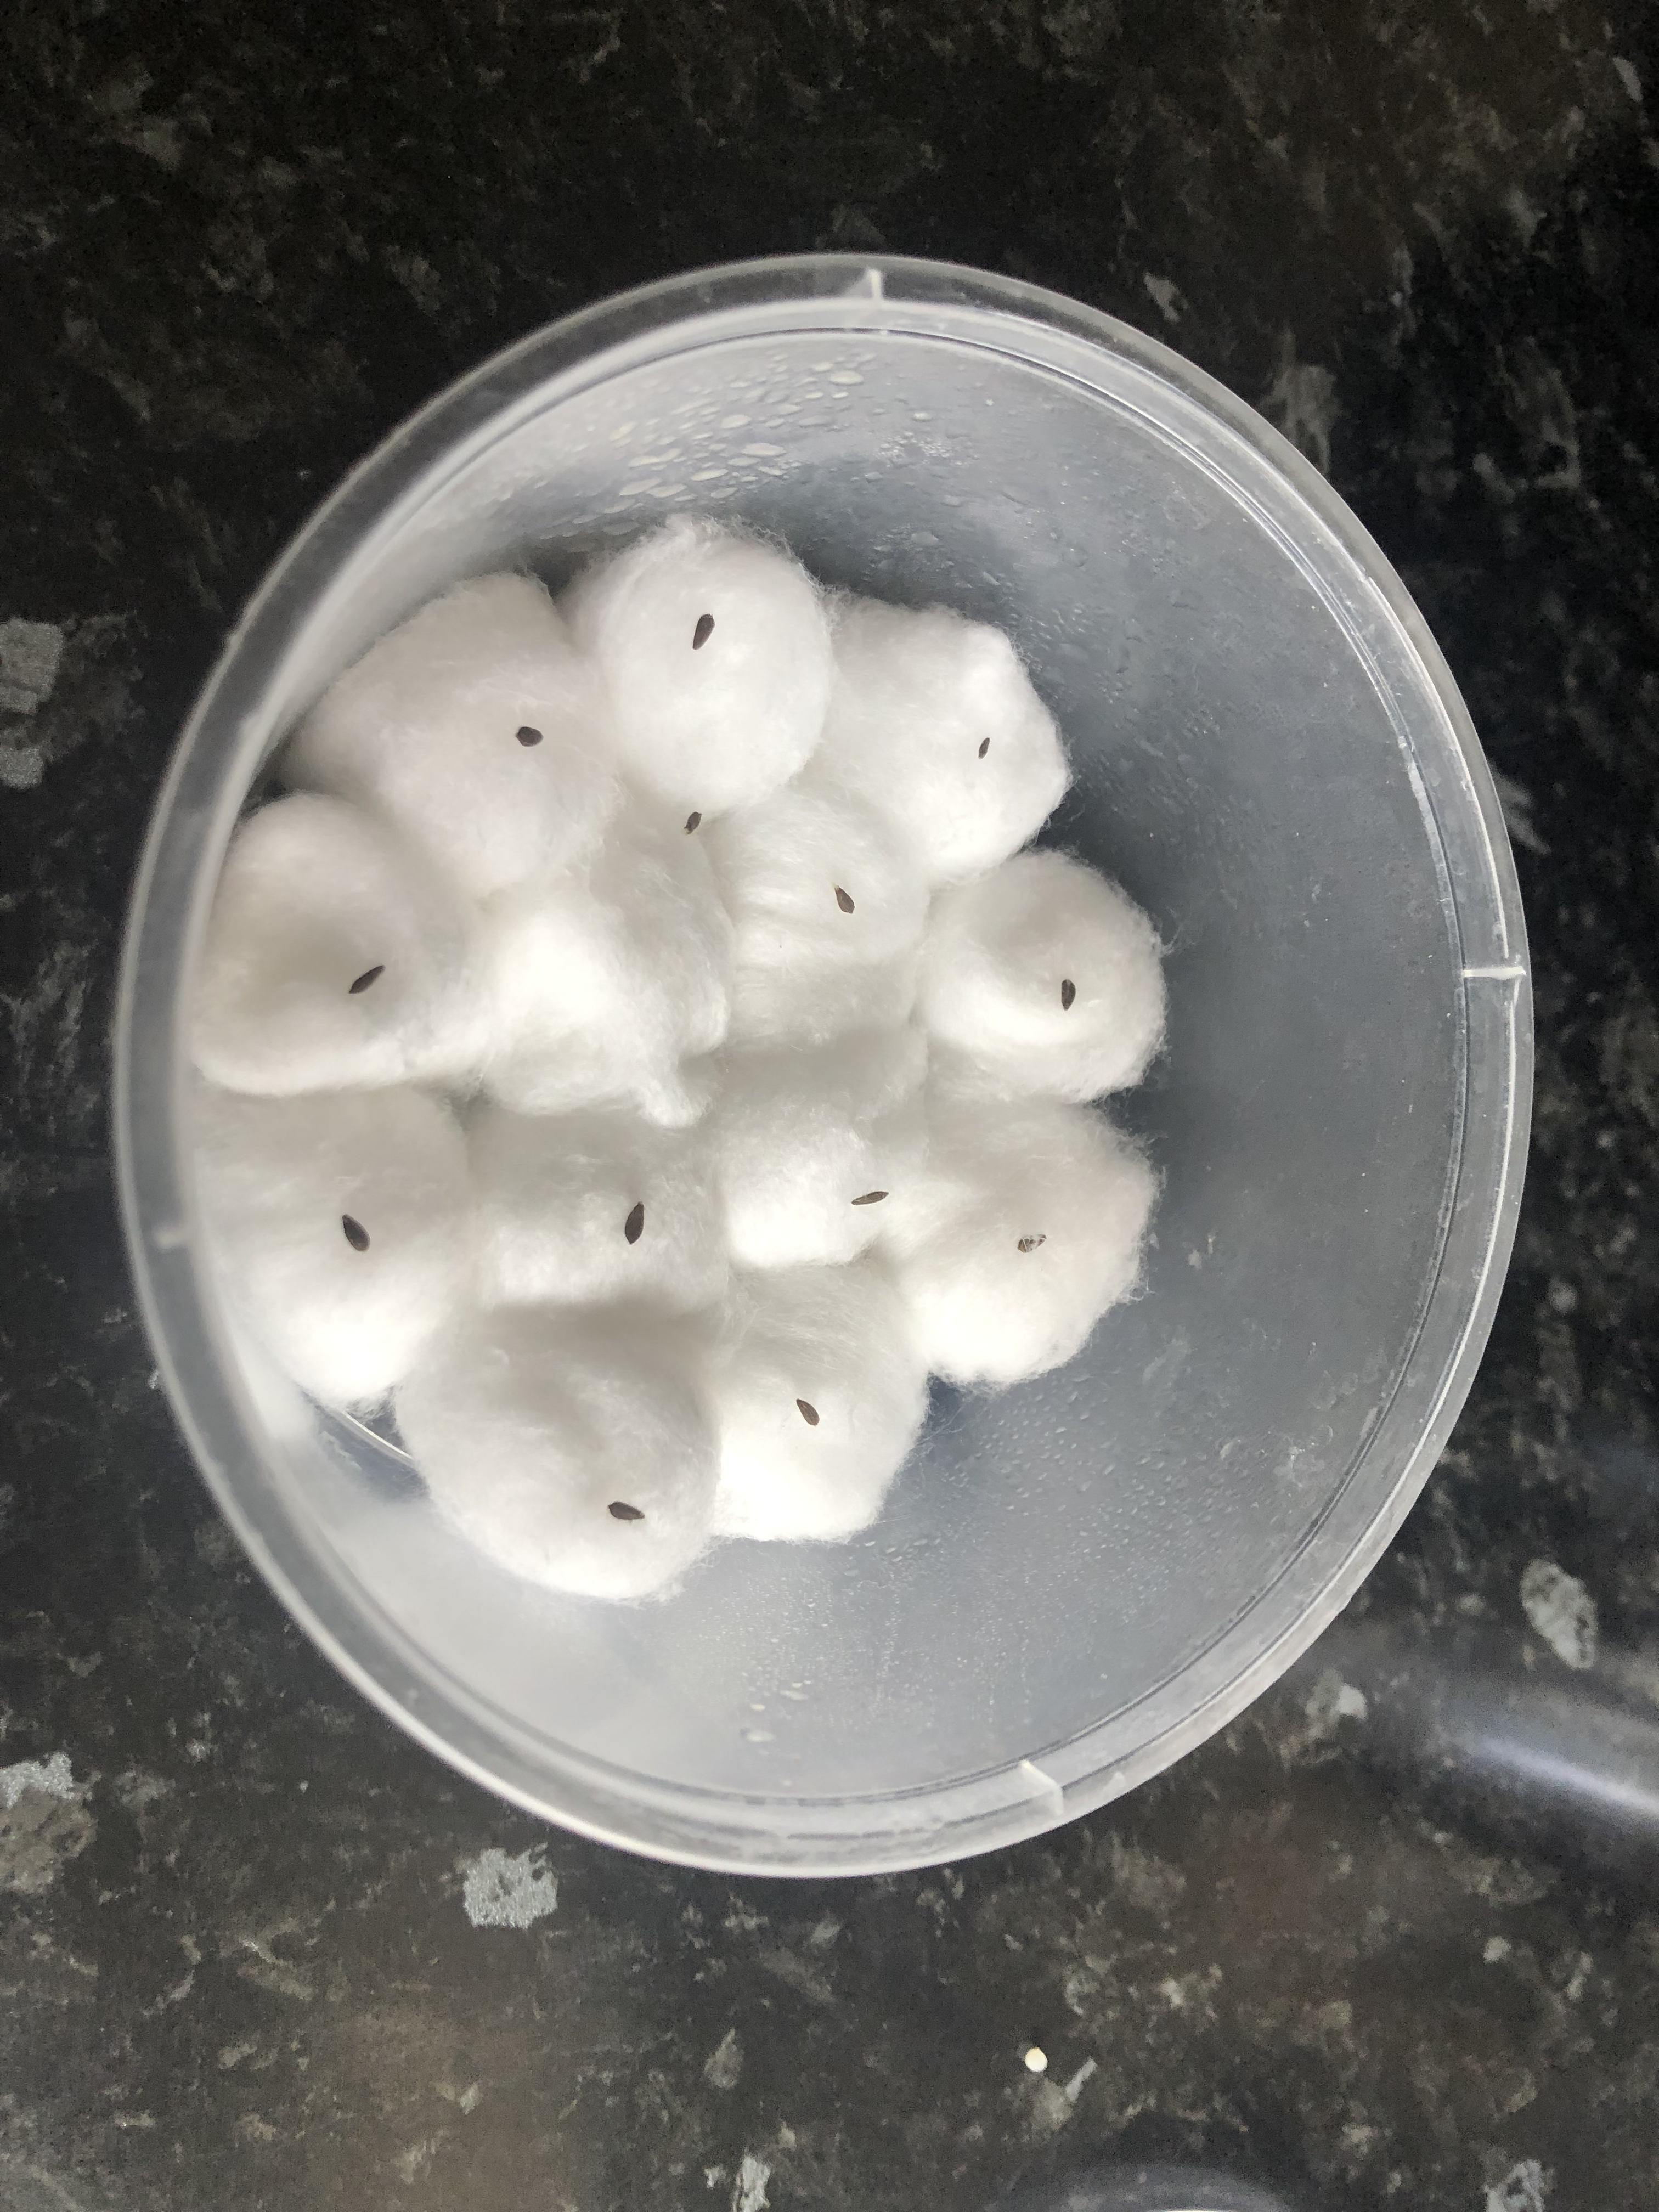
  2. This is the phase at which a dormant seed starts to sprout (producing its first leaves) / being alive. In this pilot project, the lettuce seedling is germinated by placing the seeds on moistened cotton ball. The moistened paper towel is then placed in a closed container which acts as a humidity dome to provide a nice humid environment for the seedlings to germinate. It takes approximately 7 days for the lettuce seeds to sprout.

  3. Propagation
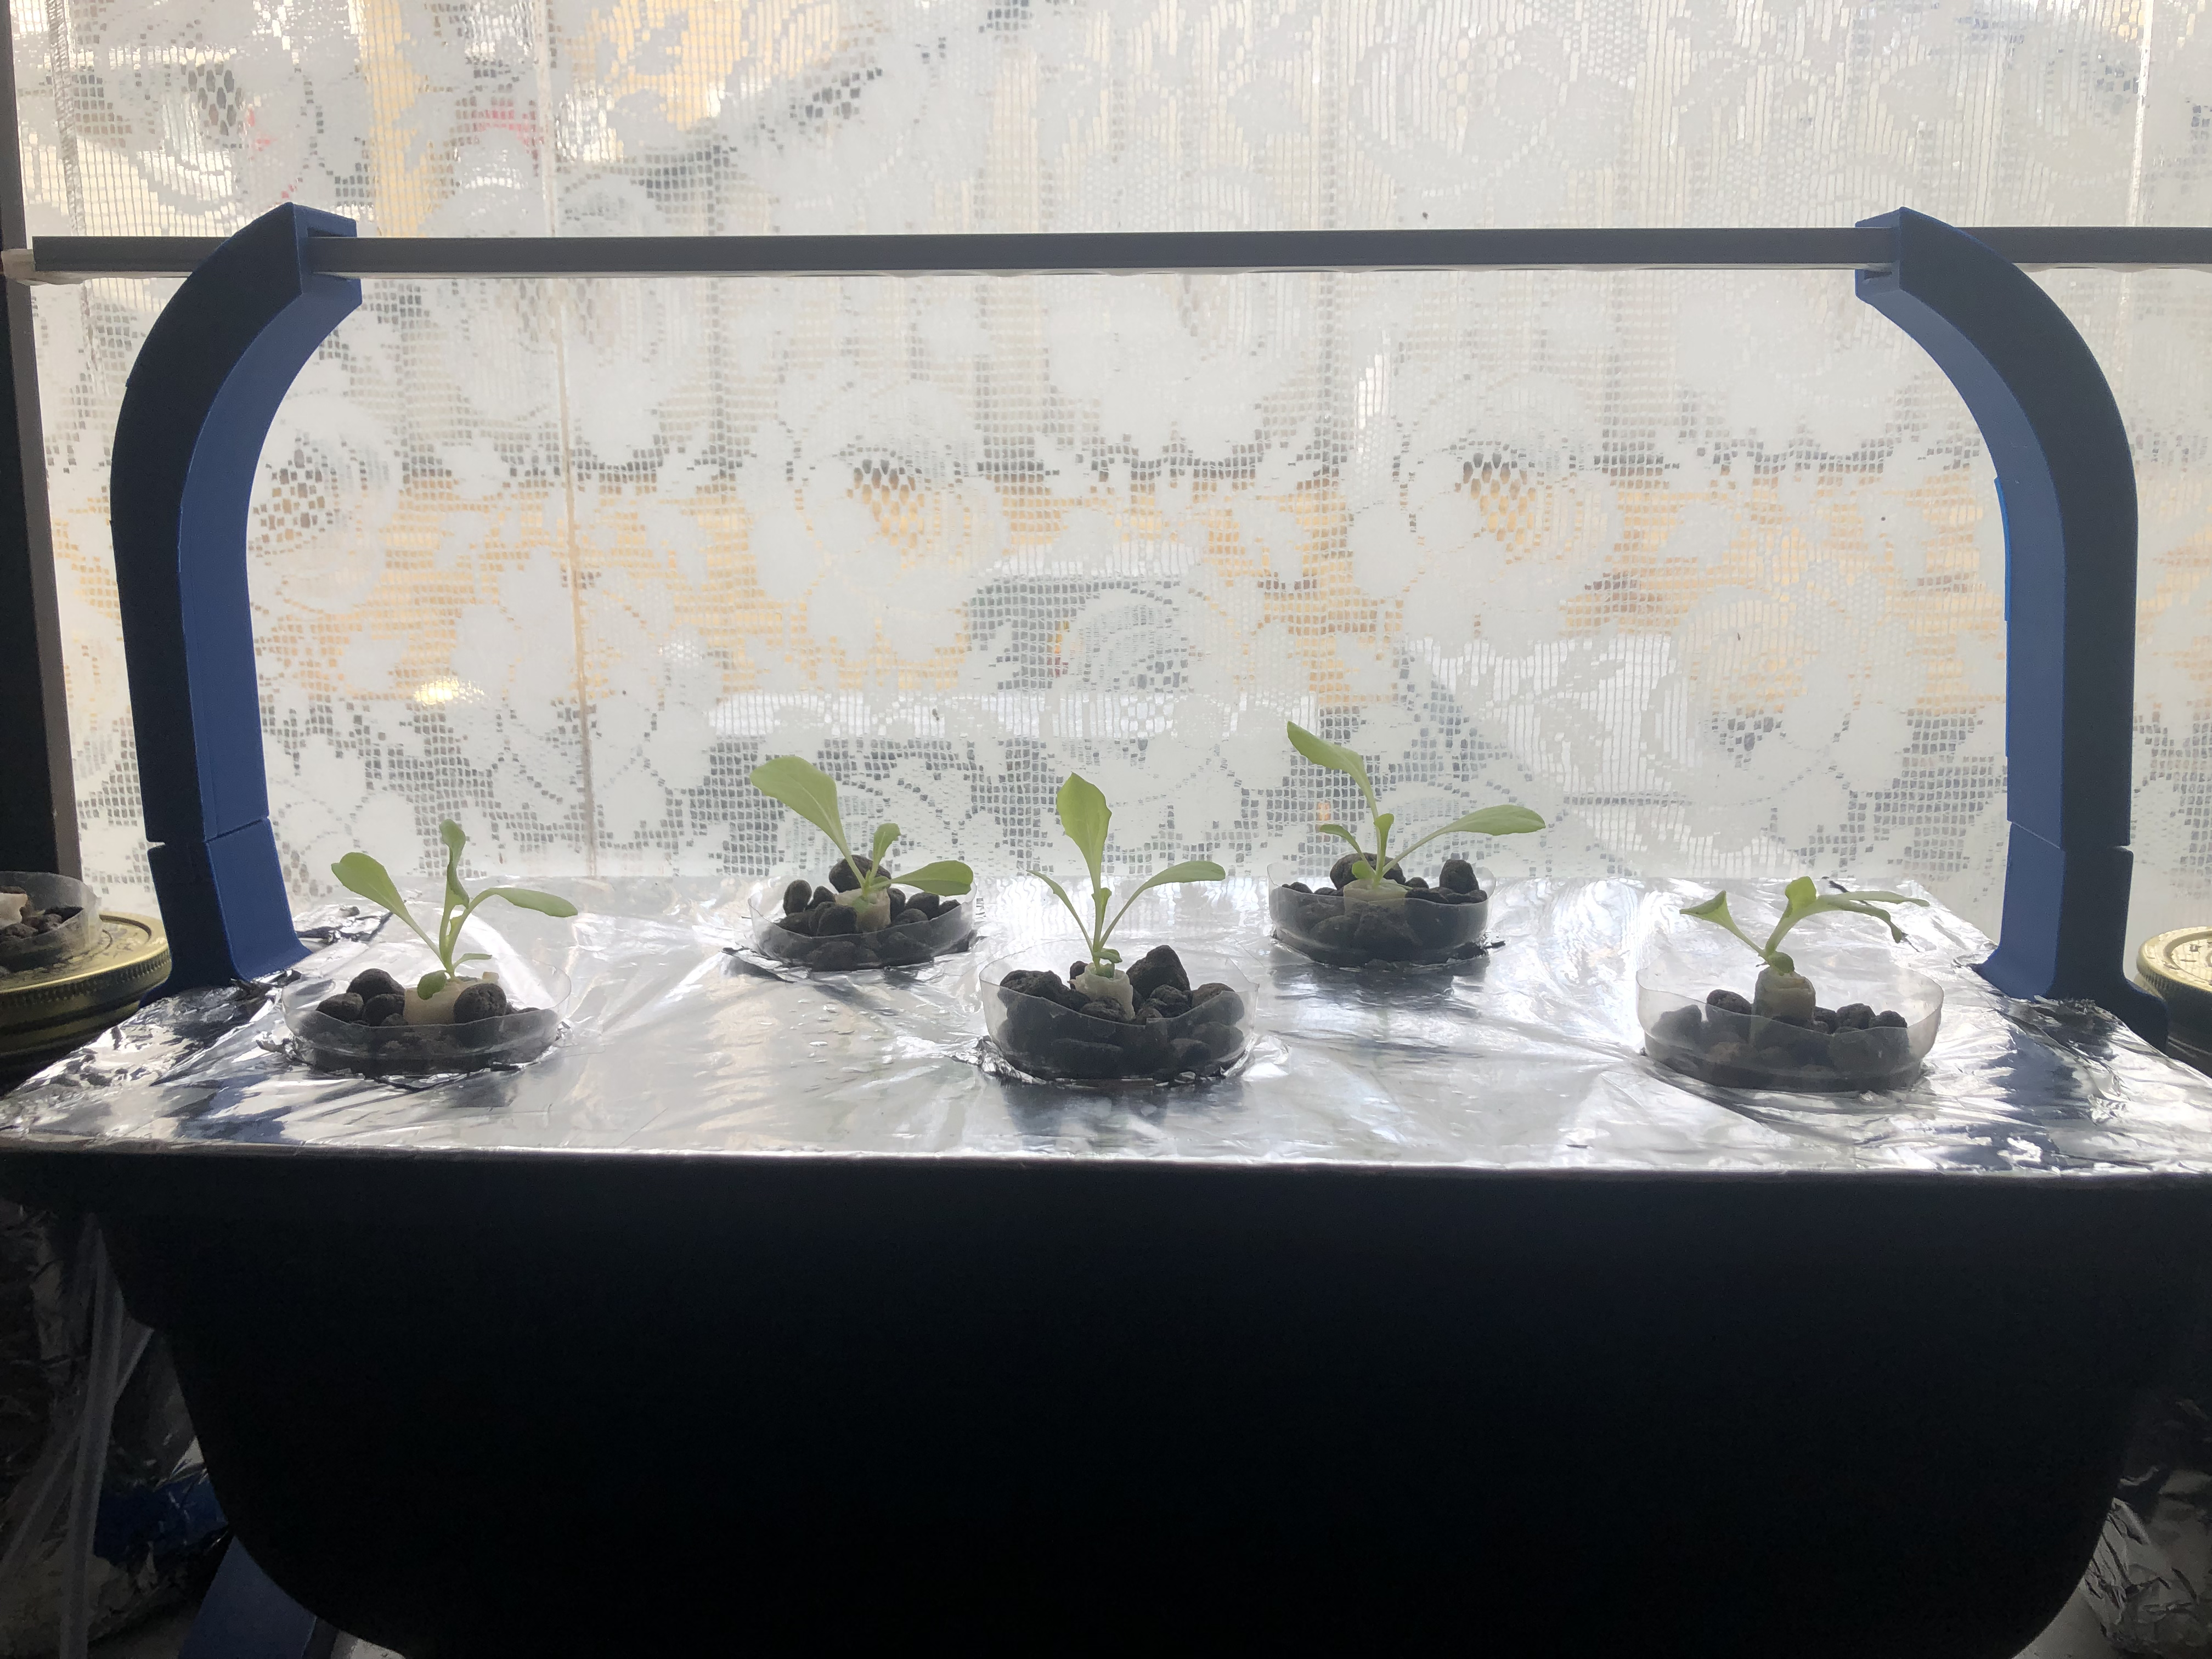
  4. Once the size of the plant is approximately 2-3 inches and the root system starts to develop (to the point it penetrates the cotton ball), the lettuce is ready to be put into the hydroponics system. Plastic cup is used as the net pot, while the cotton ball along with expanded clay pellet are used as the growing media for the lettuce.

  5. Controlled Variable and Plant Monitoring
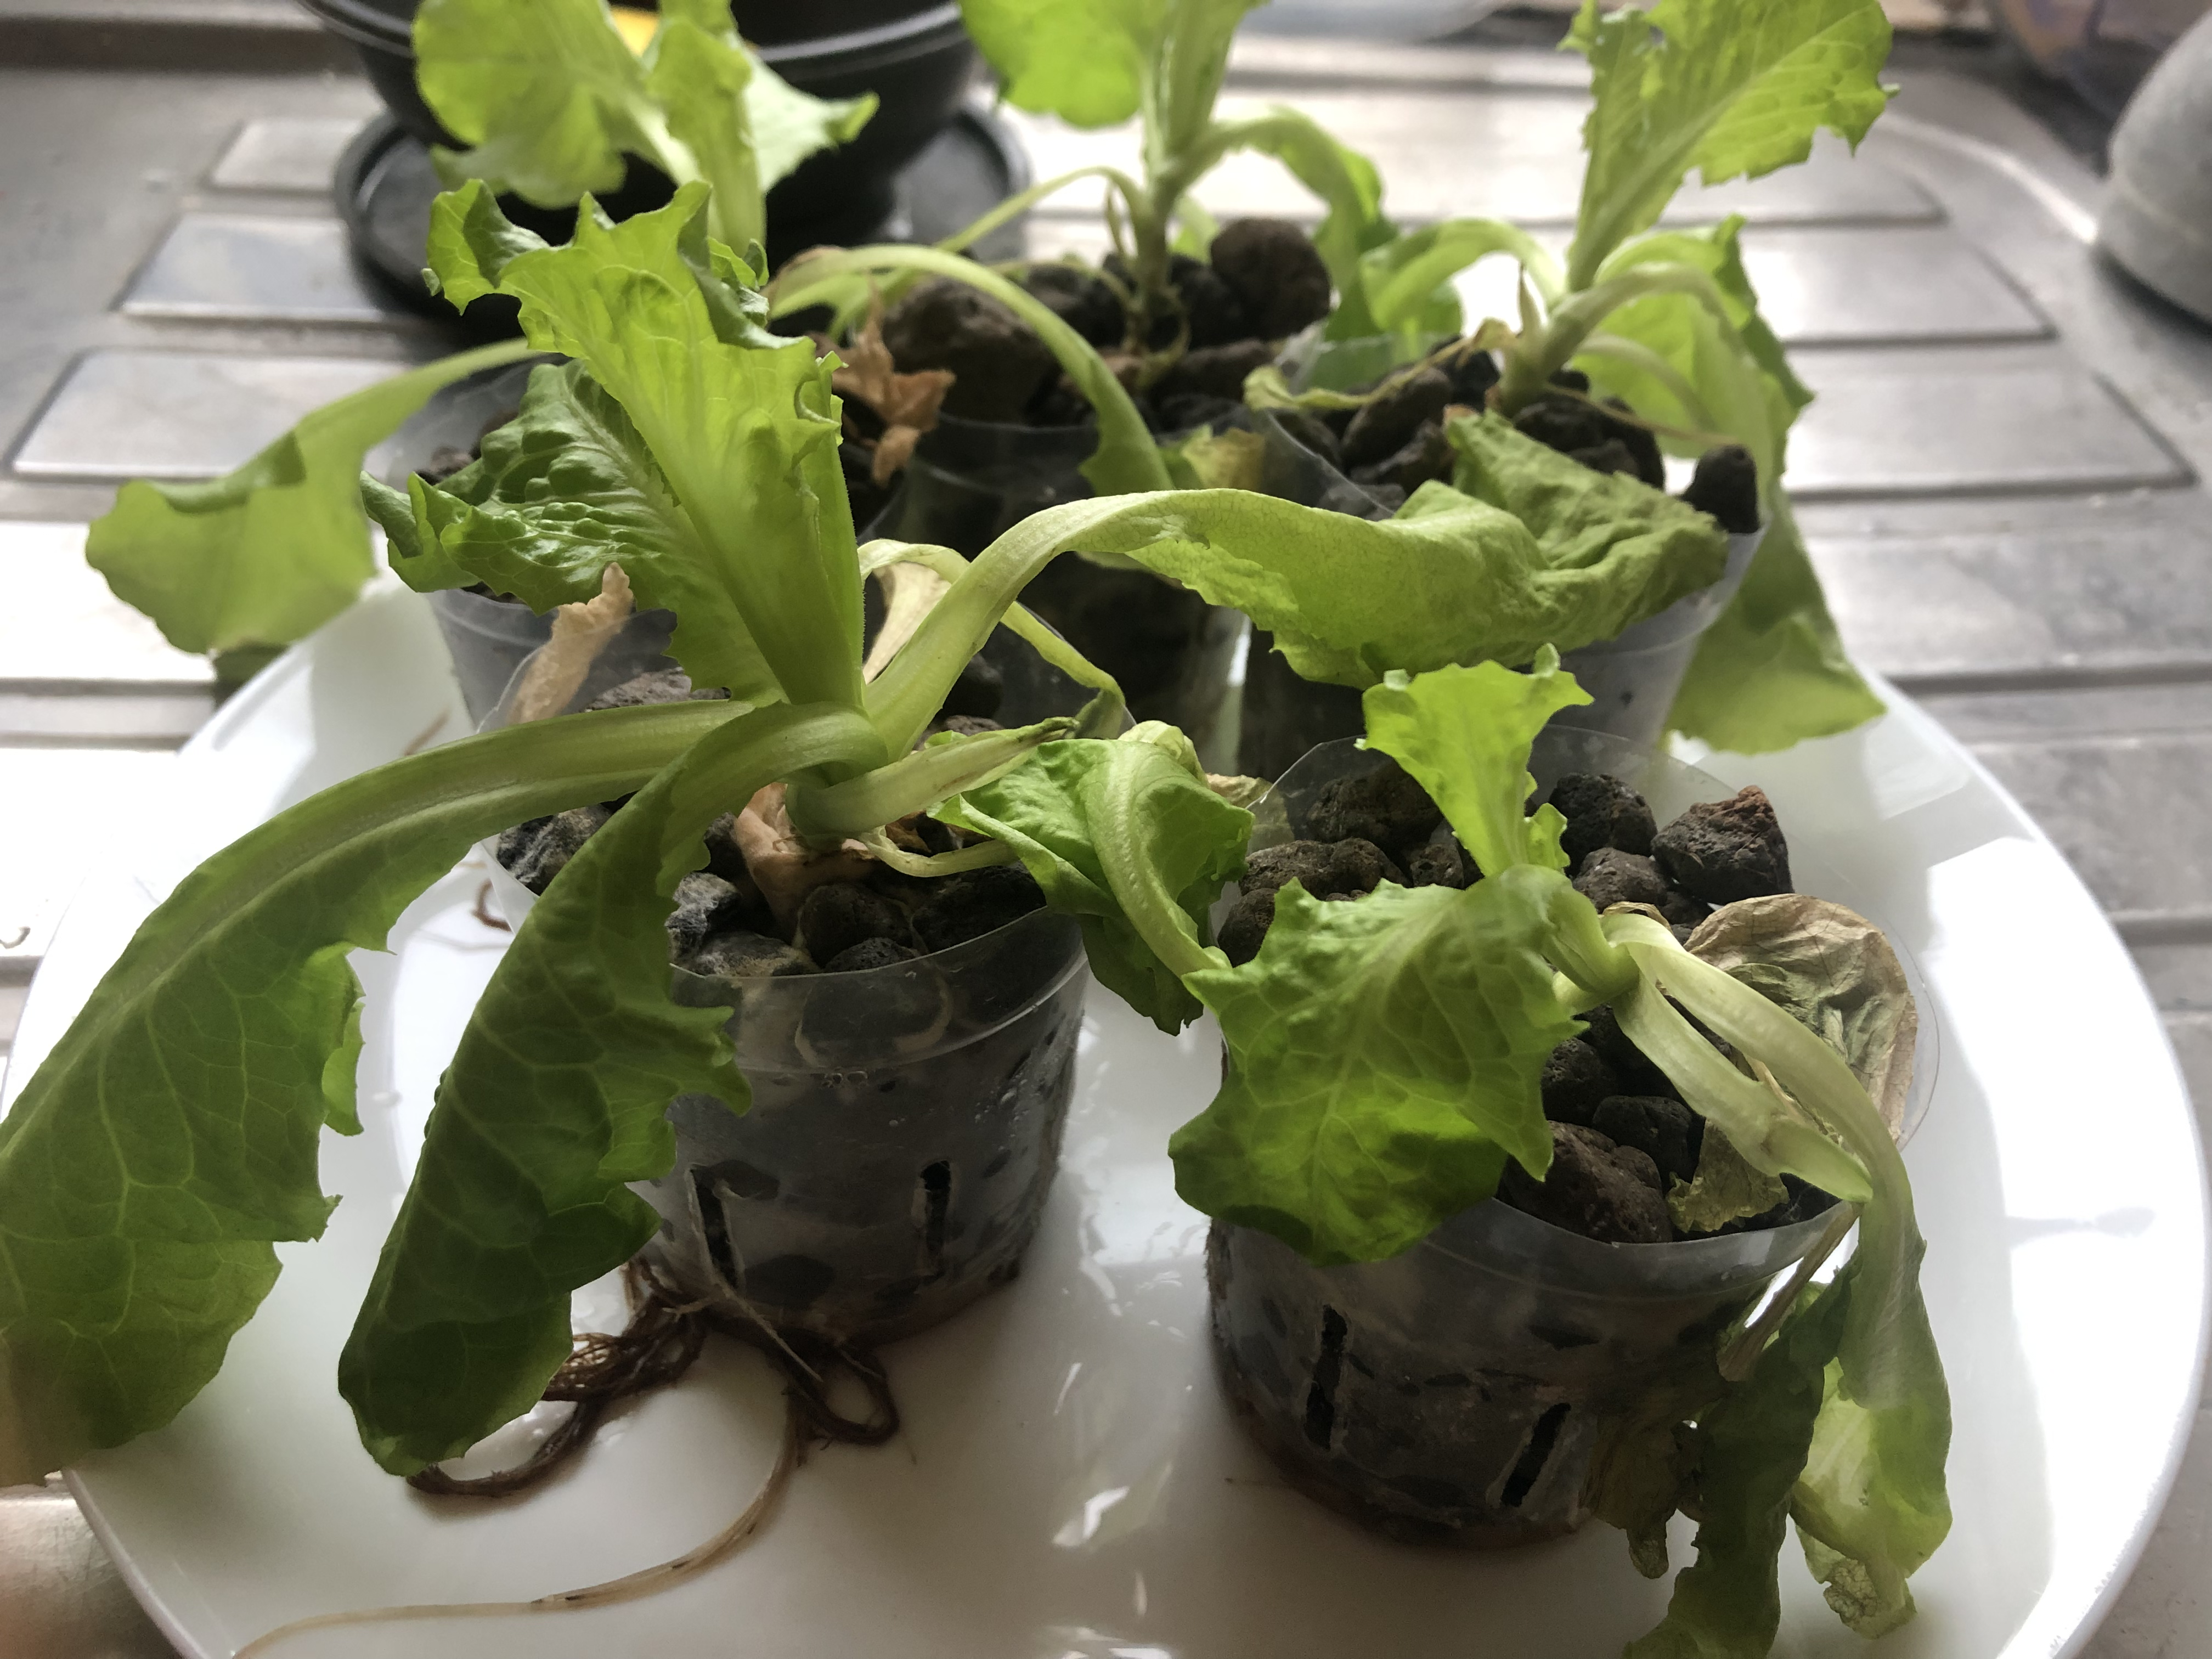
  6. The amount of nutrient in nutrient solution and the morphology (structure) of the plant should be monitored regularly to ensure the plant to always received its needs. This is the area where automation could really benefit the grower as the monitoring process itself is an iterative process that could be easily done by a system/machine. In fact, this is the central idea behind this research project.

  7. Nutrient Solution Replacement
  8. The nutrient solution should be replaced every 1-2 weeks. This is because as the plant mature, the root system will develop and absorb more nutrient which causes the nutrient level in nutrient solution to reduce. If the nutrient solution is not replaced, this can put pressure on the plant as it does not received the amount nutrient it should be getting.

Plant Timelapse

Day 1: Where the process began, the lettuce seeds are germinated using paper towel in a closed container

Day 7: Once the sprout has emerged from the seed, the sprout will be transferred into a container. This allows the sprout to prepare before being placed into a hydroponics solution. This will prevent any plant shock (nutrient/pH) will not occurred On top of that, another reason for doing this is to enable the root to develop further

Day 15: Since the sprout has grown large enough (approximately 2 inches), they are ready to be placed in a hydroponics system.

Day 30: The lettuce has grown quite well although not in an ideal fashion. This can be attributed due to several factors, among them are 1) inconsistencies in the amount and the direction of light the plant received 2) the level of pH that is not monitored.

Day 30: The hydroponics system during night. The DotStar LED can be seen to produce purple-like colour which is the region of colour that plant utilizes the most during photosynthesis.

Day 45: Lettuce on the hydroponics system wilting badly due to root rot disease

Root Rot Disease

Root rot is one of the leading reasons for sick and dying plants in hydroponics. It is caused by a fungus that thrives in damp, oxygen-poor environments. The fungus grows on the roots, preventing the plant from absorbing nutrients and gradually killing the plant altogether.

As shown in the image, the root of my lettuce is in brown color and the leaves is wilting badly which ticks off the symptoms of root rot. I believe this happened due to a failed pump which I only realised after my plant has shown wilting sign for a few days (which is too late).

Control Panel

A control panel is integrated to the hydroponics system at this stage. It consists of a 20x04 LCD display and a set of pushbuttons. These components are housed inside a 3d printed casing. The pushbuttons will be soldered on a PCB before being fit into the 3d printed casing. This control panel can serves two things:

  1. Display a clock. The clock must be set manually because Arduino Uno does not have any built-in real time clock
  2. Set the timer for grow light to be turned ON or OFF

3D Printing

A 3d printed casing is made to house the electronics component required for the control panel. The design is made with several features in mind:

  • Rounded corners for aesthetic and safety purposes
  • A set of ribs at the back of the casing to reduce the amount of materials used whilst being able to maintain its structural strength
  • Able to slot nicely to the plant pot
  • Space for all the wires for the electronics to enter and exit the casing
  • Because a high precision printer is used, the pushbutton and lcd display must be designed to fit nicely into the casing for aesthetic purpose

Shown below are the final design of the 3d printed casing:

The casing is made up of 3 smaller item which can be connected together by a screw. Both the LCD and the PCB can also be screwed to the casing to provide a greater strength. Shown below are further informations regarding the print:

3D Printer: HP Jet Fusion 580 (UCL EEE Workshop)

Material: Nylon PA 12

PCB

Shown below is the design of the PCB created at both layer:

The PCB is designed and manufactured using the facility provided by UCL EEE Department. The PCB is designed with several constraints in mind:

  • The location of pushbutton footprints must be aligned with the location of the pushbutton on the 3d printed casing
  • The location of pin header footprint must be far away from the edge of the casing as it requires some space to ensure the jumper wires connected to it can fit inside the casing

Grow Light

The grow light is responsible for providing the hydroponics system the light required by the plant. Adafruit Dotstar LED is used because of its ability to produce light with varying colours hence providing some room for experimentation for this project. The DotStar LED is fitted onto an aluminium profile in which it will then be slotted into the grow light holder. The grow light holder itself is 3d printed using the printer provided by UCL EEE Department.

The timing of the grow light to turn on and off can be configured through the control panel. At this stage, the grow light is set to produce a purple colour light. This is because plant utilises spectrum of this colour the most. However, more research (reading through academic research paper) on this topic is definitely crucial to confirm the hypothesis.

In regards with the duration the grow light should be turned on, it depends on how much light the system get during the day. The grow light would complement the amount of light (in hour) the hydroponics system get during the day. The target is for the plant to get approximately 14 hours of light each day.

3D Printing

Shown below is the 3d design of the grow light holder:

The grow light holder is made up of 3 smaller sections which can be slotted together at the joints. Because the joints are similar for all three sections, it enables the grower to adjust the height of the grow light. Shown below are further informations regarding the print:

3D Printer: Lulzbot Taz 5 (UCL EEE Project Laboratory)

Material: PLA

Programming

As mentioned earlier, Arduino Uno is the brain of the system. At the moment, this microcontroller is connected to only the control panel and grow lights. This microcontroller needs to be programmed properly so that every functionalities we discussed earlier comes to fruition.

Since there are lots of different states that the system can be in, a systematic approach is needed. Hence, why the finite state machine concept is chosen to be implemented in the code. Shown below is the finite state machine I drawn for the current system implementation.

The finite state machine above does look complicated, and it is. It does provides me with a manifestation of how complex it can be just to implement a simple control panel.

Review

This phase provides a fundamental understanding to the concept of hydroponics and cultivation in general. The pilot project conducted is a good stepping stone for me to get my hands dirty in this project, and its hydroponic design will be the base of the future phases.

However, there are still many areas on which this pilot project can be improved, and among them:

  • Use net cup to replace plastic cup and rockwool to replace cotton ball
  • Ensure the pH in the hydroponics system at the ideal level and monitor it regularly
  • Create an extensible grow light holder so that the position of grow light can be adjusted according to plant's height
  • Address the glitch that exist in control panel and improve the readability of the code
  • Find a way to identify whether the pump is working properly or not
  • Conduct a more proper research regarding the needs of plant (by going through relevant academic research paper)